


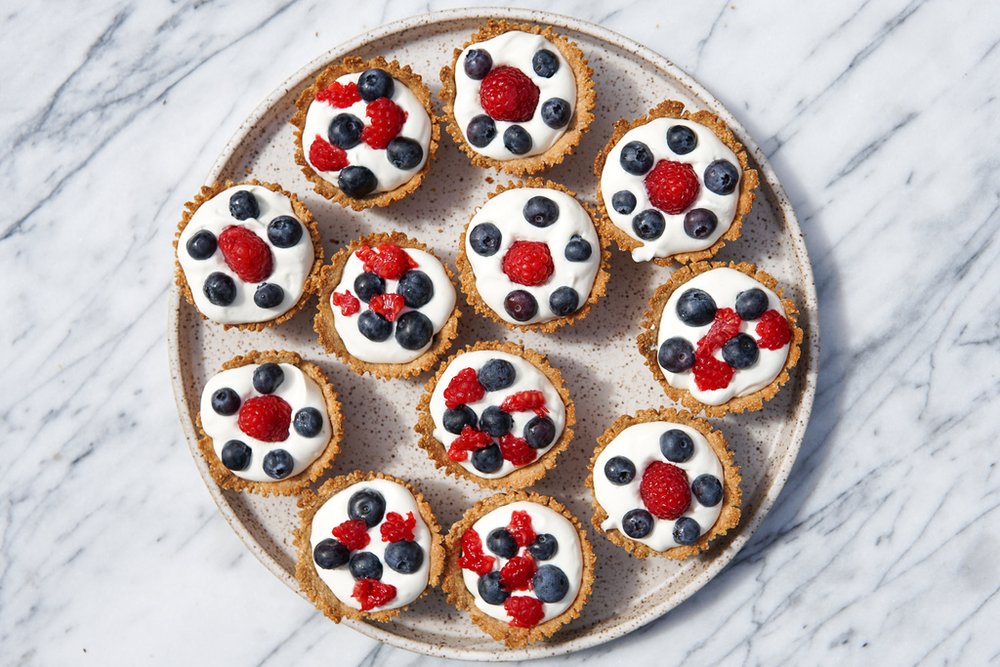
This recipe started as an excuse to eat whipped cream for dessert, but ended up being my new favorite summer treat! Little maple almond flour tarts get baked, cooled, and then filled with the most simple and delicious whipped yogurt filling. Top it with some red raspberries and blueberries for a patriotic summer dessert (but also check out the recipe notes for other fun ideas)!
 Servings 12 mini tarts
 Prep Time 20 minutes
  Cook Time 10 minutes
 Ingredients
For the almond flour crust:
- 3 tbsp (42g) butter
- 3 cups (336g) almond flour
- ¼ cup (80g) maple syrup*
- 1 tsp ground cinnamon
- ½ tsp kosher salt
For the whipped yogurt:
- 1 cup heavy whipping cream
- 2 cups plain whole milk Greek yogurt
- 2-4 tbsp powdered sugar, cane sugar, or maple syrup
- ½ tsp vanilla extract (optional)
For the toppings:
- 2 cups mixed berries
- Other topping ideas: banana slices with crumbled up graham cracker on top, Strawberry Rhubarb Sauce, grated chocolate + crumbled graham cracker, sprinkles, etc…
- *The best sugar to use for this is powdered sugar because it mixes in well and doesn’t change the color like maple syrup and coconut sugar. However, they are all good options. Make it more or less sweet to match your preferences!
- Note: It’s best to make the tarts the day before so they can cool (store in an airtight container on the counter) and then make the whipped yogurt fresh and fill them when it’s time to eat!
- Fun idea! Create a toppings station and everyone can choose what they want to put on top!
Instructions
- Preheat the oven to 350F. Line a standard muffin pan with 12 parchment muffin cups.
- In a medium microwavable bowl, add the butter and microwave in 15 second intervals until melted. Add the almond flour, maple syrup, cinnamon, and salt and mix to combine until a sticky crumbly dough forms. It’s best to use your hands at the end to make sure everything is well mixed.
- Divide the mixture between the muffin cups (about 2 tablespoons per cup), then use your fingers to press it down and up the sides of the muffin cup. It’s important to press the dough enough so that it goes all the way up the sides for the whipped yogurt to go into. Start by pressing the bottom and then work up the sides (watch the video!). If it’s sticking to your fingers too much, dip them in water and keep molding!
- Bake for 10 minutes, or until the edges turn light golden. The bottoms may puff up and crack a bit – that’s fine! If the cracks are big, you can press gently to try and make the dough stick together but once it firms up it will be fine. Let cool completely before adding the whipped yogurt.
- In a large bowl, add the whipping cream and use an electric beater to beat on high until stiff peaks form (about 2-4 minutes). Add in the yogurt, sugar, and vanilla (if using) and beat until combined and fluffy (just about 30 seconds). Taste and add more sweetener, if needed.
- Add a scoop of whipped yogurt into each (completely cooled) tart cup so that it fills almost to the brim. Top with berries (or whatever toppings you want) and dig in! I also like to sprinkle a bit of salt on top at the end.
Items you can prep ahead (optional)
- Make the almond flour crust mixture, form the tarts, and bake them!
- Whipped yogurt is best fresh, but you could make this in advance the day of.
Substitutions:
- To make vegan, sub the butter with virgin coconut oil. You could try substituting the heavy cream with coconut cream (here are instructions on how to make it) and you could try adding a plant-based yogurt (but just use 1 cup) or just do all coconut whipped cream (recommend it this way rather than adding yogurt).
- Be sure to check out the topping ideas under the recipe.
Storage:
- Store leftover filled cups in an airtight container in the fridge for up to 2 days. The crust will absorb some of the filling and get soft, but it’s still yummy.
- If stored separately, the baked tarts will keep in the fridge for up to 6 days or freeze them for up to 2 months. The whipped yogurt will keep for 2-3 days in the fridge.
Leftovers + Repurposing:
- If you have leftover cups that are already filled, the crust will absorb some of the moisture from the filling and get soft, but it’s still yummy.
- If you stored the crust and filling separately, just assemble!


leave your comments!